

Cladding Clip Installation Guide: How to Choose the Right Clip for Tile & Porcelain Panels
Cladding Clip Installation for Thin Tile & Porcelain Panels
Cladding clip installation provides additional mechanical fixing for ceramic tiles, porcelain slabs and other compatible facade panels. These clips are typically used together with tile adhesive or other bonding systems to provide an additional mechanical connection between the panel and the wall or supporting structure.
They are typically installed together with tile adhesive or other bonding systems to provide an additional mechanical connection between the panel and the wall or supporting structure.
Different cladding clips use different fixing principles. Some rely on a simple groove and insertion tab, while others use mechanical interlocking structures such as the K-Type figure-eight groove system. The correct clip depends on the panel thickness, groove profile, required fixing depth, wall clearance and installation method.
In this guide, we compare the main types of cladding clips and demonstrate their installation methods through step-by-step videos.
How to Choose the Right Cladding Clip
1. Ceramic Tile or Porcelain Slab?
For smaller and lighter ceramic tiles, a compact Cladding Hook is often sufficient as a secondary mechanical fixing.
For larger porcelain slabs or thin large-format panels, a wider Cladding Clip may provide a more suitable mechanical fixing arrangement.
2. Panel Thickness
Panel thickness directly affects the available groove depth and the appropriate fixing clip.
Thinner panels generally require:
- Smaller fixing components
- Shallower or angled grooves
- Smaller mechanical fasteners
Thicker panels can accommodate deeper groove profiles and larger clip designs.
3. Simple Groove or Mechanical Interlocking Groove?
This is one of the most important differences between your products.
Standard Cladding Clip / Cladding Hook
Simple groove → Clip insertion → Epoxy reinforcement
K-Type Cladding Clip
Figure-eight”八” groove → Double-hook engagement → Mechanical interlocking
The K-Type design provides stronger mechanical engagement because the clip is physically locked into the figure-eight groove rather than relying mainly on adhesive to keep the clip in place.
| Cladding Clip Type | Typical Panel | Groove / Connection | Main Characteristic |
|---|---|---|---|
| Standard Cladding Clip | Tile / porcelain | Straight or angled groove | Simple secondary mechanical fixing |
| Cladding Hook | Smaller ceramic tiles | Straight / angled groove | Compact fixing structure |
| K-Type Cladding Clip | Tile / porcelain | Figure-eight groove | Double-hook mechanical interlocking |
| K-Type Bottom-Mount Clip | Tile / panels under beams | Precision groove | Bottom-mount / soffit fixing |
| Fiber Cement Board Clip | Fiber cement board | Factory-prepared groove | Concealed mechanical connection |
| L-Type Aluminum Cladding Clip | Exterior tile | Prepared groove | Mechanical fixing with controlled joint spacing |
| H-Type Grooved Tile Cladding Clip | Grooved exterior wall tile | Edge groove | H-profile groove engagement |
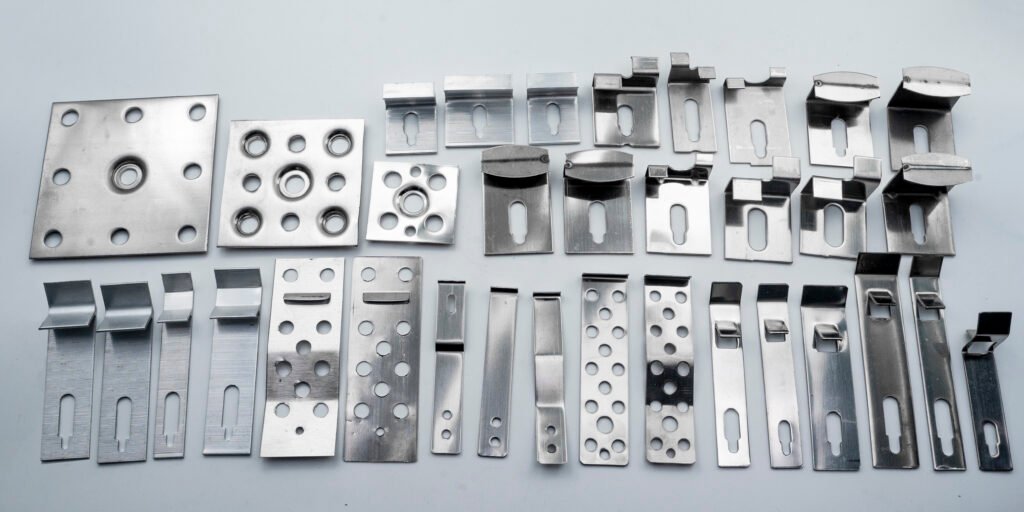
How do I choose the right cladding clip?
The clip should be selected according to panel material, thickness, groove profile, fixing depth, wall clearance and installation method.
Do cladding clips replace tile adhesive?
In most tile and porcelain applications, cladding clips are used as additional mechanical restraint alongside an adhesive fixing system rather than as a complete replacement for the adhesive.
What is the difference between a standard cladding clip and a K-Type clip?
A standard clip typically engages with a simple prepared groove, while a K-Type clip uses a double-hook interlocking structure with a precisely machined groove in the panel.
Can cladding clips be customized for different panels?
Yes. Clip profile, size, material and groove compatibility can be customized according to panel design and project requirements.